Step 4
Installing the Motherboard


When installing a motherboard into any case there are a few things to be aware of. First off make sure to wear anti-static glove or ground yourself to the case or motherboard tray while you are working with the motherboard. I have not seen it personally but I have heard that static electricity can cause a motherboard to go bad while installing it. Second thing I hope you have patience. If you get into a hurry you may accidentally forget a step and have to start over again. Trust me its very annoying and time consuming to have to redo what you have already done. Now lets get to installing the mother board.
- Ok you should have full access to the mount point on your case or on your motherboard tray. Open the contents of your Motherboard box and pull all the ribbons and screws out. Remove the install manual and be sure to look through it. They are included for a reason. But for the most part it will be used in a later step. Now you may remove your Motherboard from the anti static wrapping they ship it in and place it on top of the anti static bag. Verify that all they parts listed on the box or in the manual are there that are supposed to be.
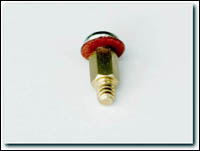 Now is a good time to put on your anti-static glove or gloves whichever the case may be. Inspect the rear panel of the Motherboard and be sure you have the appropriate rear panel plate
for the case (should be in the box with the motherboard). Lay the motherboard in place on the motherboard tray and make a note of where the mounting screw holes are on the board and
ensure they line up with the tray or case. Inside the bag with the screws, either the motherboard or the case screws you should find screws like these to the right. The copper/gold
screw will screw into the tray/plate. And the silver screw will screw into it to hold the motherboard. We'll get to that. So for now remove the motherboard and set it back onto the
antistatic bag. Screw the gold screws into the tray/plate in the locations you noted the mount holes to be on the motherboard.
Now is a good time to put on your anti-static glove or gloves whichever the case may be. Inspect the rear panel of the Motherboard and be sure you have the appropriate rear panel plate
for the case (should be in the box with the motherboard). Lay the motherboard in place on the motherboard tray and make a note of where the mounting screw holes are on the board and
ensure they line up with the tray or case. Inside the bag with the screws, either the motherboard or the case screws you should find screws like these to the right. The copper/gold
screw will screw into the tray/plate. And the silver screw will screw into it to hold the motherboard. We'll get to that. So for now remove the motherboard and set it back onto the
antistatic bag. Screw the gold screws into the tray/plate in the locations you noted the mount holes to be on the motherboard. - Now that they are in place verify that they are lined up with the mount holes in the motherboard. Do not force the motherboard to make it fit. If need be, make adjustments as needed. In your bag of screws you will find some red paper washers. There should be enough for 2 for each mount point. Place one centered ontop of each gold screw you intalled. Now set the motherboard in place and try not to move it around. You don't want it to move the red washers out of place or you will have to start over. Now use the silver bolts and place a red washer on each of them and start them all in place accordingly to your mount points.
- After you have all the screws started tighten them firmly but don't over tighten. Make sure that your screwdriver does not slip and scratch the board. If this happens it could be devastating. Now reinstall the tray back into your case. Be careful you don't snag any wires within your case. Don't get into a hurry keep the gloves on.
You have just installed the motherboard into your case. See that wasn't sooooooo bad. For some of you the hard part is over.